Integrating Machine Learning into Web Application with Flask |
您所在的位置:网站首页 › creating a webpage using python and flask › Integrating Machine Learning into Web Application with Flask |
Integrating Machine Learning into Web Application with Flask
|
2. Develop your web application with Flask and integrate your model
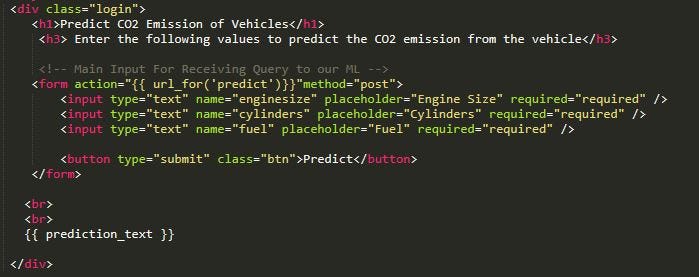
Now that we have our model, we will start developing our web application with Flask. Those of you starting out in Flask can read about it here. Flask learning resources: Flask Tutorials by Corey Schafer, Learn Flask for Python — Full Tutorial 2.1. Install Flask:You can use the ‘pip install flask’ command. I use the PyCharm IDE to develop flask applications. To easily install libraries in PyCharm follow these steps. 2.2. Import necessary libraries, initialize the flask app, and load our ML model:We will initialize our app and then load the “model.pkl” file to the app. #import libraries import numpy as np from flask import Flask, render_template,request import pickle#Initialize the flask App app = Flask(__name__) model = pickle.load(open('model.pkl', 'rb')) 2.3. Define the app route for the default page of the web-app :Routes refer to URL patterns of an app (such as myapp.com/home or myapp.com/about). @app.route("/") is a Python decorator that Flask provides to assign URLs in our app to functions easily. #default page of our web-app @app.route('/') def home(): return render_template('index.html')The decorator is telling our @app that whenever a user visits our app domain (localhost:5000 for local servers) at the given .route(), execute the home() function. Flask uses the Jinja template library to render templates. In our application, we will use templates to render HTML which will display in the browser. 2.4. Redirecting the API to predict the CO2 emission :We create a new app route (‘/predict’) that reads the input from our ‘index.html’ form and on clicking the predict button, outputs the result using render_template. #To use the predict button in our web-app @app.route('/predict',methods=['POST']) def predict(): #For rendering results on HTML GUI int_features = [float(x) for x in request.form.values()] final_features = [np.array(int_features)] prediction = model.predict(final_features) output = round(prediction[0], 2) return render_template('index.html', prediction_text='CO2 Emission of the vehicle is :{}'.format(output))Let’s have a look at our index.html file :
app.run() is called and the web-application is hosted locally on [localhost:5000]. “debug=True” makes sure that we don’t require to run our app every time we make changes, we can simply refresh our web page to see the changes while the server is still running |
【本文地址】